Creating Your First World
This guide explains how to create and upload a very simple VRChat world. You'll learn the basics of setting up a Unity scene, using VRChat's Control Panel, and publishing your world.
Requirements
Before you get started, ensure that you meet the following requirements:
- You should have a Unity project with the VRChat SDK set up.
- You must have an account on VRChat.com.
- If you're playing on a Steam or Meta account, you'll need to link your account first.
- To upload a world, your VRChat account must have a trust rank of "New User" or higher.
- If you're new to VRChat, you'll receive an email once you're allowed to upload worlds.
- You can still locally build and test worlds until you reach this trust rank. This means you can work on and test your world, but only you'll be able to visit it.
Need help? Visit our Discord at discord.gg/vrchat or our official forum at ask.vrchat.com.
Step 1 - Setting up a scene
The first thing you need is a Unity scene. You can either create a new scene, or open an existing Unity scene with pre-existing content. If you created a new project from the Creator Companion, skip to step 2.
With the scene open, you need to add a VRC Scene Descriptor to your scene. You can easily add it with the VRChat SDK:
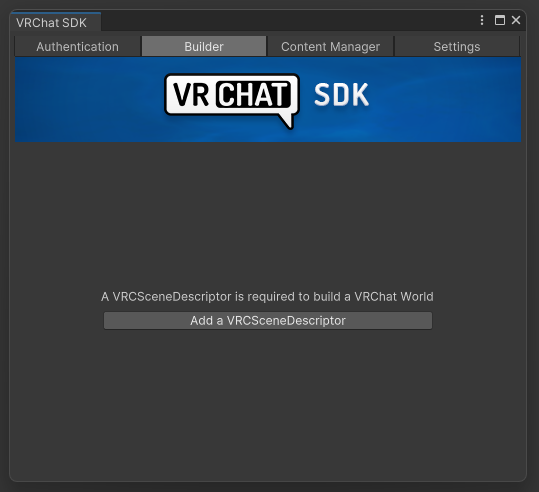
- Click VRChat SDK > Show Control Panel.
- If you do not see this menu at the top of your Unity window, your SDK may not be installed correctly. Try clicking Assets > Reimport All, and check our SDK troubleshooting guide.
- In the Authentication, log into your VRChat account.
- Switch to the Builder tab and click Add a VRCSceneDescriptor.
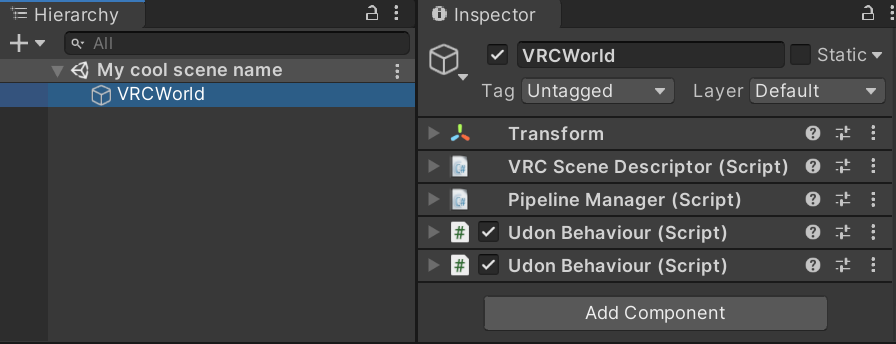
A Game Object called VRCWorld will automatically be added to your scene. It contains a VRC Scene Descriptor and other helpful components. Click on VRCWorld in your hierarchy to inspect its settings.
Step 2 - Creating spawn points
Your world needs at least one spawn point. When players join your world, that's where they'll appear. By default, players will spawn at the location of your VRCWorld prefab. Simply move the VRCWorld prefab to wherever you'd like users to spawn.
If you'd like to create additional spawn points, create an empty Game Object and place it where you want users to appear. Add the Game Object to the Spawns list in the VRC_SceneDescriptor component. Do this for as many spawn points as you want.
If you have more than one spawn point, you can choose the order in which people will spawn into them by changing the Spawn Order property.
When multiple players spawn into your world in rapid succession (for example, as everyone arrives after going through a portal), they may appear inside one another if they use the same spawn point. To avoid this, you can set the Spawn Radius to a value above zero to have players spawn at a random point in a disc around each spawn point instead.
Step 3 - Descriptor Settings
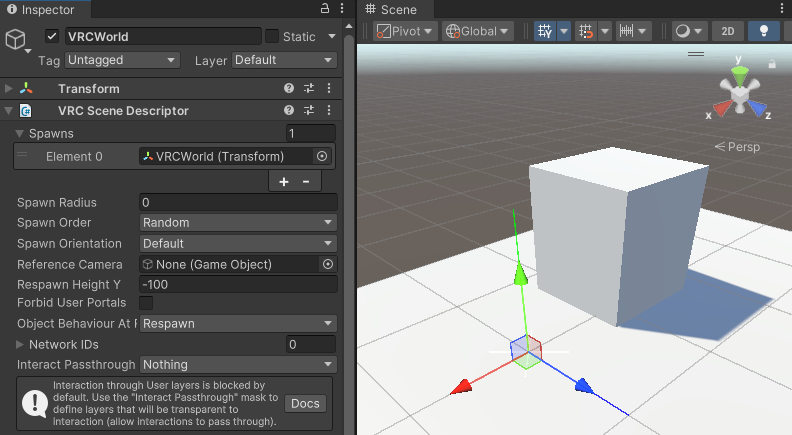
There are various settings in the VRC_SceneDescriptor that change the behavior of your world. Here are some of the more important ones.
Spawns - An array of transforms where players will spawn when they join your world. By default, players spawn at your Scene Descriptor.
Respawn Height - The vertical height (on the y axis) at which players respawn and pickups are respawned (or destroyed, depending on the "Object Behaviour At Respawn" setting).
Reference Camera - Settings you apply to this camera will be applied to the player when they join the room. It is most often used for adjusting the clipping planes and adding post-processing effects.
More settings can be found on the VRC_SceneDescriptor page.
Step 4 - Configure your World in the SDK build panel
Click VRChat SDK > Show Control Panel. Before you can upload your world, you need to give VRChat some basic information about it, such as the world's name, capacity, or content warnings.

- Name - The name of your world, as shown to everyone.
- Description - This will be displayed on the 'World Details' page in VRChat and on the website.
- Maximum Capacity - The maximum amount of players allowed in your world.
- If an instance has reached its player capacity, new players cannot join.
- The instance creator, world creator, or group owner can always join, even if it would exceed the player capacity. (Unless they do not have permission to enter/see that instance)
- Recommended Capacity - The recommended maximum amount of players for your world.
- If a public instance has reached its recommended capacity, VRChat will discourage more players from joining. The instance will stop appearing in VRChat's list of public instances.
- Players can still try to join the instance under some circumstances if they have a direct invite URL on vrchat.com.
- Content Warnings - Warnings that work in conjunction with VRChat's Content Gating system.
- Tags - Keywords that help users find your world in VRChat.
- World Debugging - Allows other users to debug your Udon code.
- Thumbnail - A preview image of your world.
If you uploaded your VRChat world with an old VRChat SDK, without 'recommended capacity', player capacity works differently:
- 'Recommended capacity' will be the same as your player capacity value
- 'Player capacity' will be twice your player capacity value
For example: If you set 'Player capacity' to 10 and did not set 'Recommended capacity', your actual 'Player capacity' will be 20. 'Player capacity' was sometimes referred to as the 'soft cap' for this reason.
Step 5 - Check for warnings or validation messages
In the second section of the VRChat SDK build panel, you'll find a list of alerts and validation messages. These are suggestions on how to set up your scene and build your world. For example:
- Is your scene missing a VRC Scene Descriptor?
- Is your scene missing VRChat's layers and collision layer matrix?
- Are there any issues with Audio Sources, textures, or Udon scripts?
The SDK will often give you the option to fix these issues automatically. If not, please read the validation messages carefully to learn how to improve your world. Some of the messages are optional and are not required for uploading your world.
Step 6 - Building and publishing your World
Your trust rank must be "New User" or higher to upload content to VRChat. If your rank is "Visitor", you can still locally build and test your worlds.
Next, you need to build the world! Under the "Build Type" drop-down menu, you have a few different options for what you want to do next:
- If you want to upload your world directly to VRChat so other users can visit it, choose "Build & Publish Your World Online".
- If you instead want to test your world without uploading it, choose any of the appropriate testing options:
- "Build & Test Your World" - Builds your world and then launches it in VRChat.
- "Build & Reload Your World" - Builds your world, then automatically sends you to the locally built world in your current VRChat session. If VRChat is not running, this will just build the world.
- "Test Your Last Build" - Launches the most recent build of your world in VRChat.
- "Reload Your Last Build" - Automatically sends you to the most recent build of your world in your current VRChat session. If VRChat is not running, this will do nothing.
You should also select which platforms you'd like to build your world for.
When using any of the local build options, you'll see these additional settings:
- Clients - How many VRChat clients the SDK should start during local testing. Setting this to a value above 1 will start multiple VRChat sessions you can control independently, which can be useful for testing network related features. Setting it to 0 will prevent any clients from starting.
- Force Non-VR - If enabled, the SDK will start VRChat in desktop mode even if a VR headset is detected.
- Enable World Reload - If enabled, the SDK will start VRChat with world watching enabled. This means the client will automatically send you to local worlds that are built while it's running.

Keep in mind that you're not permitted to upload content to VRChat that violates our Community Guidelines or Terms of Service. Doing so will result in moderation action.
After uploading your world, it will become available in VRChat! You should be able to see it in-game or via the content manager in the SDK via VRChat SDK > Show Control Panel > Content Manager.
If your world fails to upload, check Unity's console to see if there are any errors. If there are any, solve them before trying to build your world again. Make sure to read the entirety of Unity's log, and click on errors to see additional information.
Check our other documentation, the Ask Forum, or ask on Discord if you need help. Make sure to provide as much information as possible, such as Unity console errors.