Upgrading Projects to Unity 6
This page explains how to upgrade your VRChat project from version 2022.3.22f1 to Unity 6000.0.67f1. Unity 6000 is required to use the latest version of the VRChat SDK. You can check out the benefits to upgrading here.
If you're using the Creator Companion, upgrading your project is easy! But first, make sure you create backups of your projects.
Backing up your Unity project
If you're using the VRChat Creator Companion, it automatically suggests backing up your project before migrating it.
You can also create additional backups at any time by clicking the three dots (...) next to the 'Manage Project' button, then choosing "Create Backup".
Backups are stored as .zip files. Learn more about backups in the VCC FAQ.
- If you made changes to your project's
Udon,UdonSharp, orVRChat Examplesfolders, those changes are not included in the.zipfile. - To back up your whole project, including the folders above, you can duplicate your entire project folder and rename it to something like
YourProjectName-Backup. This may take longer. - We do not recommend exporting your entire project as a Unity Package. This takes longer and may cause errors.

Back up your project. Do not skip this step. Otherwise, you risk breaking or losing your project.
Upgrades can fail. A backup keeps your original project safe, allowing you to restore it and try again if something goes wrong.
Preparing your project
Open your project in Unity 2022 before upgrading to Unity 6000. Look for errors or warnings in Unity's console or the VRChat SDK Build panel.
- If you don't fix issues in your Unity 2022 project, they may cause issues in Unity 6000.
- Some warnings can be safely ignored, but you should try to understand why they're present.
If you've tested your Unity 2022 project and it's in a good state, you're ready to upgrade!
After successfully uploading a world or avatar with Unity 6000, you won't be able to upload it again with Unity 2022. Test your content before uploading it.
Using the Creator Companion
You can upgrade your project from the 'Projects' section or from your project's 'Manage Project' page.
Ensure that your Unity project is closed before upgrading.
- Ensure that your Creator Companion is up to date by going to 'Settings' and clicking 'Check for Updates'. Outdated versions cannot upgrade projects to Unity 6000.

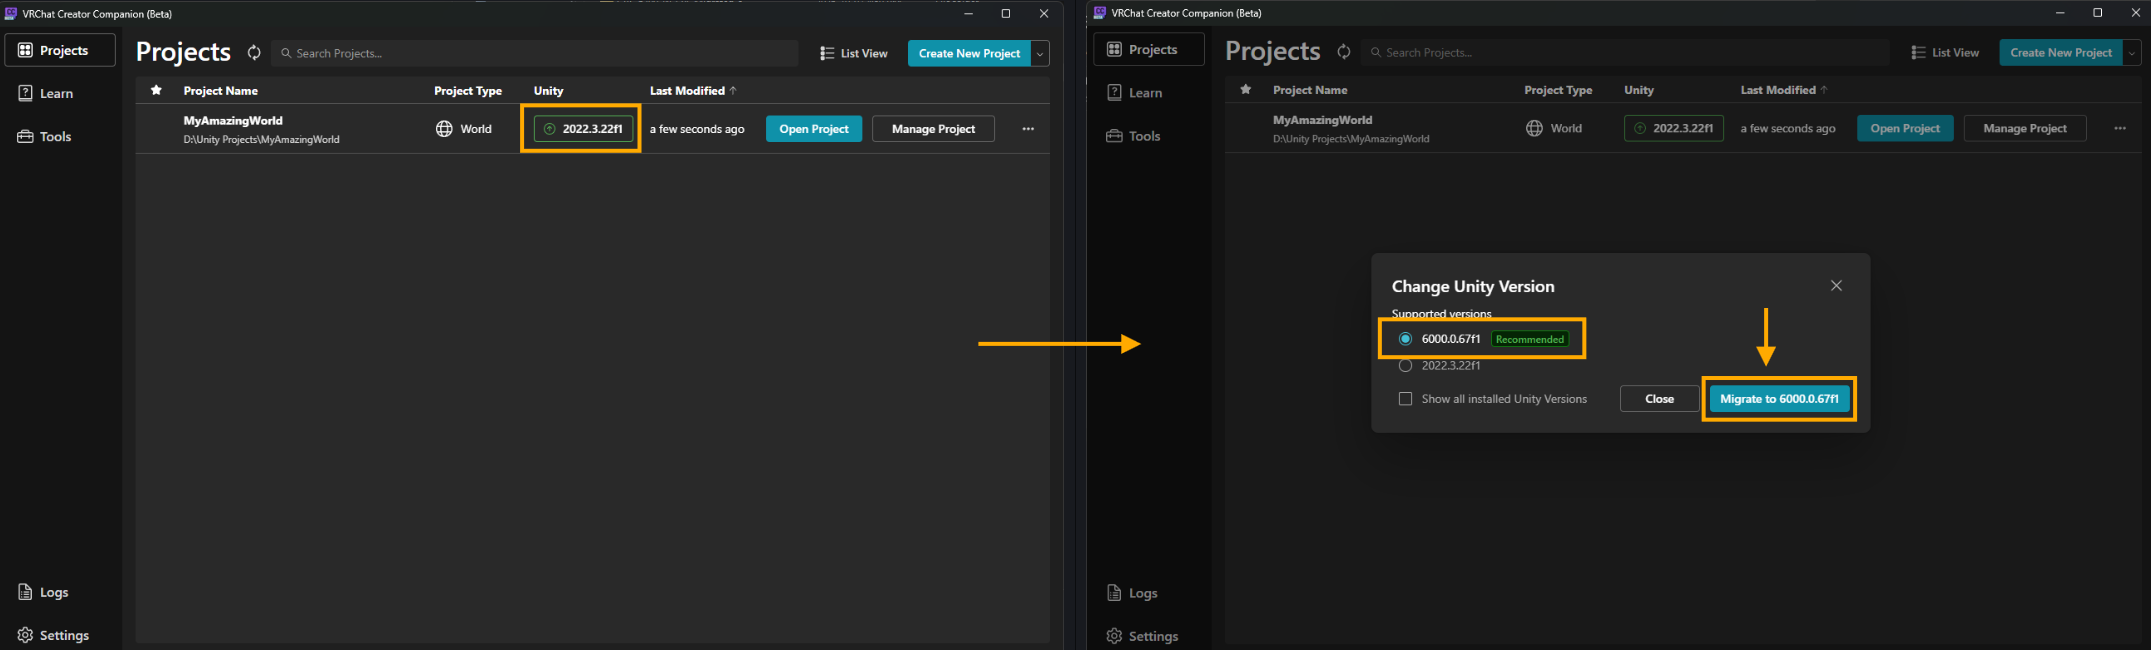
- On the 'Projects' page, click the Unity column next to the project you'd like to update. Then click 'Migrate to Unity 6000'.
Alternatively, click Manage Project on any project, and click the 'Upgrade to 6000' banner.
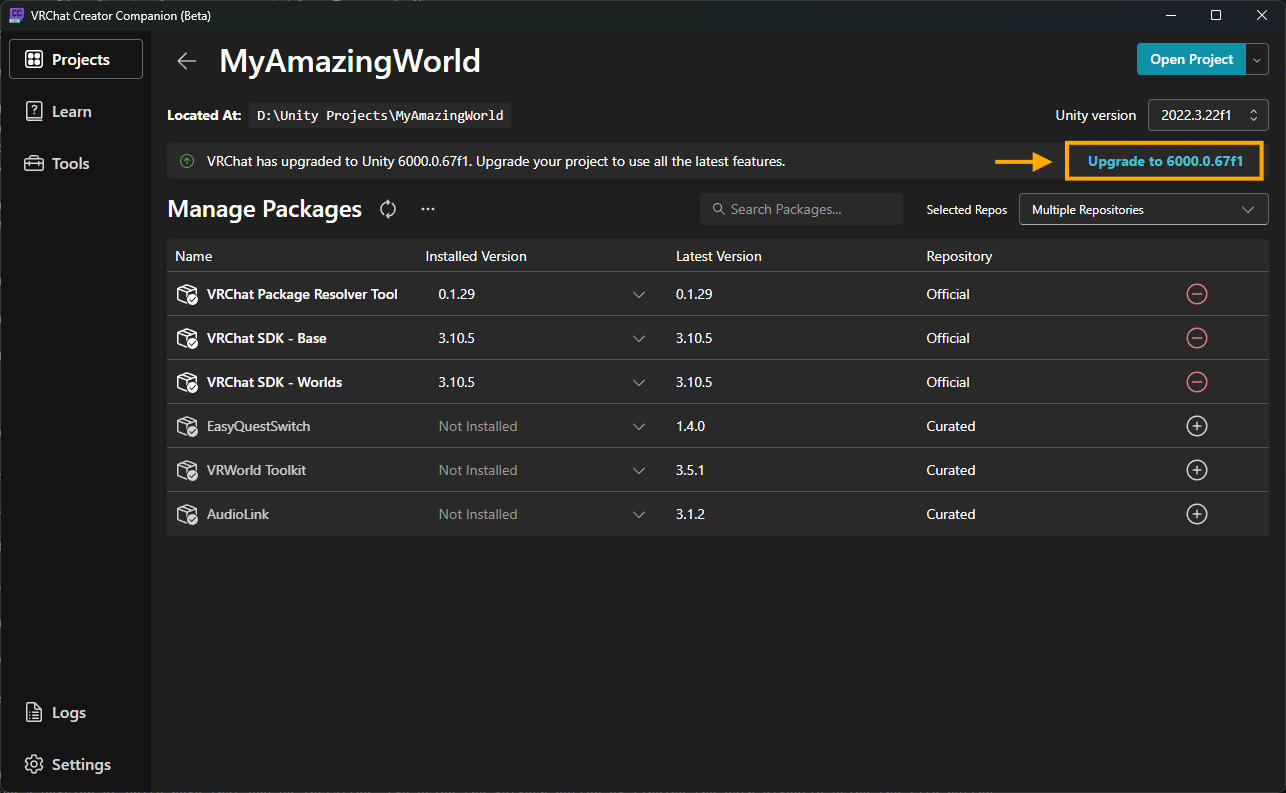
- Wait for the migration. After it's done, your project automatically opens in Unity 6000.0.67f1.
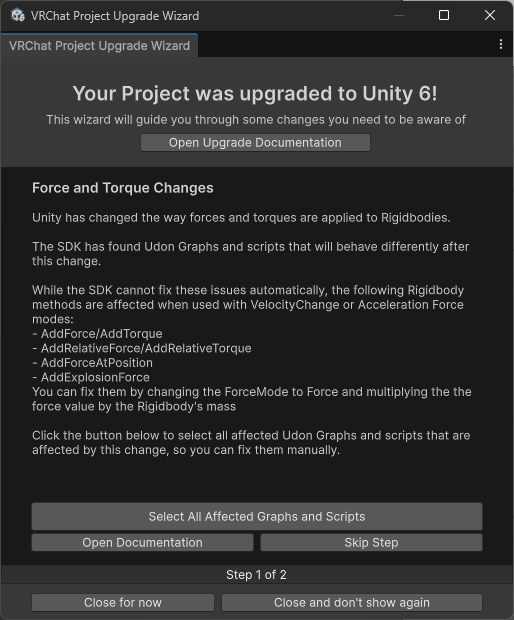
- The Upgrade Wizard describes the Changes in Unity 6000 and makes some automatic changes to your project. However, you must apply some of the fixes yourself.
Using the Unity Hub
Unity Hub is a separate application that allows you to seamlessly install and work with multiple Unity versions at one time. You can also use it to install Unity 6000 if you do not wish to use the Creator Companion.
- Install the Unity Hub.
- You can follow Unity's official installation guide.
- You'll need to create a Unity account after installing Unity Hub.
- Sign into your Unity Account.
- Visit Unity's download archive.
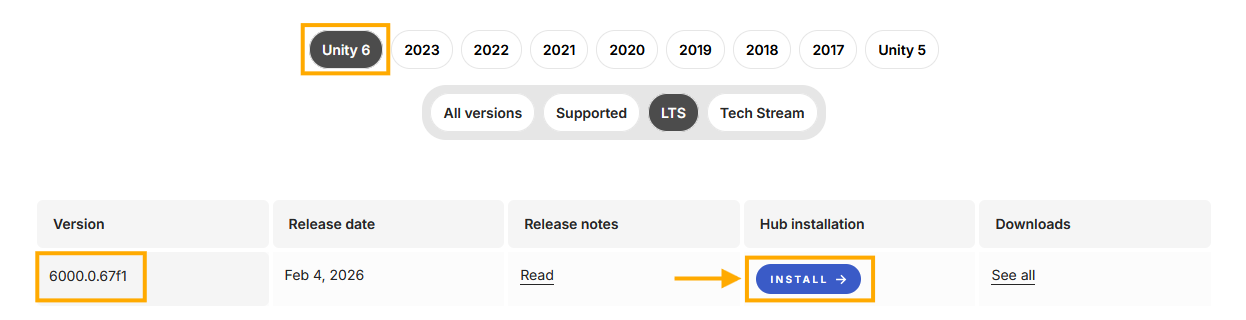
- Click Unity 6000.x.
- Scroll down until you see Unity 6000.0.67 and click the blue Unity Hub button.
- Do not choose the first Unity version in the list!
- You can also go to the Current Unity Version page to find a link to download the correct version of Unity.

- Click Open Unity Hub in your web browser.
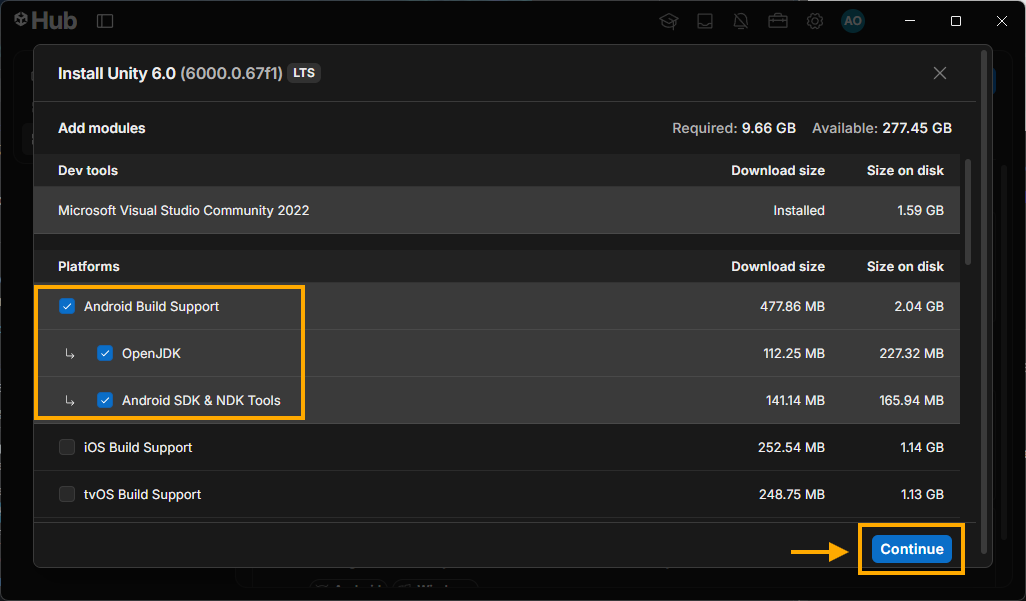
- Enable Android Build Support in the Unity installation screen.
- You can skip this if you're not planning on uploading content to Android or Quest yet.
- You can complete this step later by choosing Add modules in the Unity Hub.
-
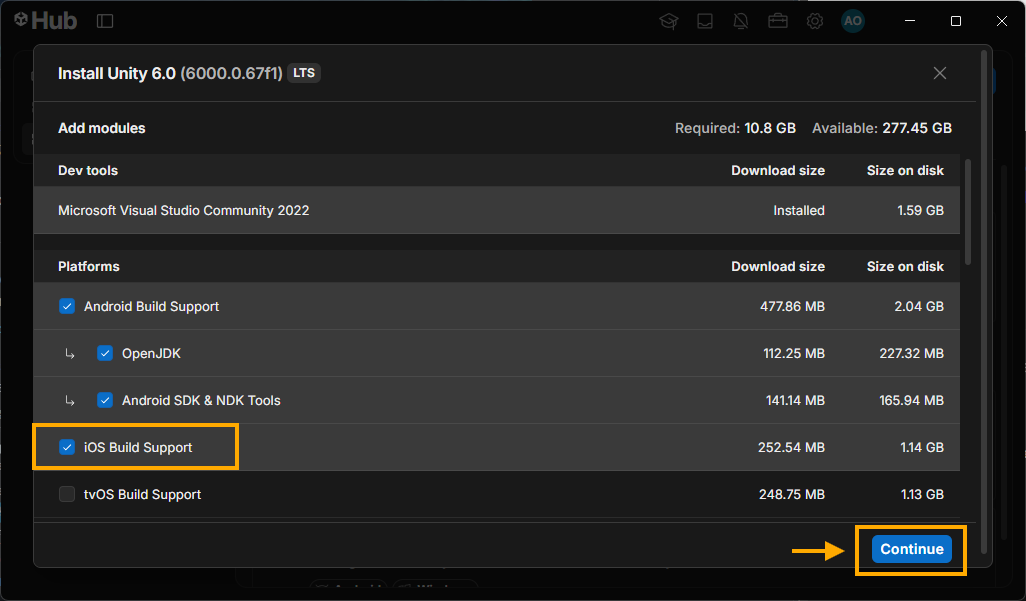
Enable iOS Build Support in the Unity installation screen.
- You can skip this if you're not planning on uploading content to iOS yet.
- You can complete this step later by choosing Add modules in the Unity Hub.
-
Click Continue to install Unity 6000.0.67.
Managing Unity versions
It's easy to check what versions of Unity are available on your PC for use with the Creator Companion. You can also change what version of Unity is used to open all new projects.
- In the CC, go to Settings.
- Under Unity Editors, use the dropdown menu to change the default Unity editor. This will not apply retroactively to any projects already created.
- If you have not already installed Unity 6000.0.67, follow the instructions above.
- If you don't see a version of Unity here that you've installed, try using the refresh button or finding the path directly using the file button.
Packages
If you are trying to add packages to your 6000 project, please keep in mind:
- Every Curated Package has a version which works in 6000.
- Other packages may work, but some may need a new version from the package author!
- Many errors will result from using out of date packages, so make sure anything you import is compatible with Unity 6000.
Troubleshooting
- Test your world before uploading it. Check Unity's console for errors, and test your world in VRChat to see if it works.
- After successfully uploading a world with Unity 6000, you won't be able to upload that same world with Unity 2022.
- Make sure to activate your Unity Personal license before using VRChat's SDK. Unity is free for personal use.
- To learn more about the Unity Hub, visit Unity's documentation.
- If you're experiencing issues related to the SDK itself, please read our SDK Troubleshooting page.
Changes in Unity 6000
Unity 6 introduces changes you should be aware of, especially when upgrading an older project. Some of these are automatically fixed by the Upgrade Wizard when you open your project with Unity 6000.0.67f1 for the first time. You can also open the Upgrade Wizard manually via VRChat SDK > Utilities > Upgrade Wizard.
Velocity Changes
Unity has renamed the Rigidbody.velocity field to Rigidbody.linearVelocity.
How to fix
- Your UdonSharp scripts are fixed automatically by Unity via the API Upgrade process.
- Your Udon Graphs can be upgraded using the Unity 6 Upgrade Wizard.
- Any custom systems that create UASM directly must be adjusted manually.
- If you do not know what this means, it most likely doesn't affect you.
- You need to replace
UnityEngineRigidbody.__get_velocityandUnityEngineRigidbody.__set_velocityexterns withUnityEngineRigidbody.__get_linearVelocityandUnityEngineRigidbody.__set_linearVelocityrespectively.
Force and Torque Changes
Unity 6 changes how forces and torques affect Rigidbodies when using Acceleration or VelocityChange force modes.
These changes require a manual fix if you use the following methods in your scripts:
AddForceAddTorqueAddRelativeForceAddRelativeTorqueAddForceAtPositionAddExplosionForce
How to fix
- Change the
ForceModefromAccelerationorVelocityChangetoForce. - Multiply the force vector by the rigidbody's mass.
TextMeshPro Changes
TextMeshPro now uses a linear color space, which darkens colors compared to previous Unity versions. Unity also updated TextMeshPro's shaders, which requires updating TextMeshPro's package.
How to fix
- Import the updated TextMeshPro package. The Unity 6 Upgrade Wizard offers an auto-fix for this.
- In every scene that has been migrated from 2022 to Unity 6, perform a color conversion.
- You can do this via the Upgrade Wizard. It opens automatically when the scene is loaded for the first time.
- This can also use VRChat SDK > Utilities > Convert Current Scene TextMeshPro Colors > To Gamma.
Particle System Changes
Unity has changed how Ring Buffer mode works in Particle Systems. Going forward, any particle system that has the ring buffer set to Loop Until Replaced no longer allows the system to go beyond the Max Particles limit.
How to fix
- Observe your particle systems in the Unity Editor or in VRChat.
- If you notice that your particle systems stop emitting new particles when they should, adjust the Max Particles limit of the particle system.
NavMesh Changes
Attaching NavMeshObstacle components to NavMeshAgents produces different results in Unity 6.
How to fix
- Remove any
NavMeshObstaclecomponents from GameObjects with aNavMeshAgentcomponent present.- This can be done via the Upgrade Wizard. It opens automatically when the scene is loaded for the first time.
- The SDK also shows a validation warning in the Alerts section of the SDK Builder panel, with an Auto Fix button.
- This might result in slightly different behavior. You can use the Priority field of the
NavMeshAgentcomponent to adjust collision avoidance between agents.