It's highly recommended to work with the Demo prefabs and Starter Scene first. Read through the instructions to Build From Demo Parts.
Customizations
Ok, you've made a simple remix of our demo parts, and you're now ready to add your own custom PowerUps, Hazards and more. Read on to learn how to make new prefabs that interact with the existing systems.
Making Custom Checkpoints
Here is the hierarchy of the Checkpoint prefab we include:
Trigger Requirements
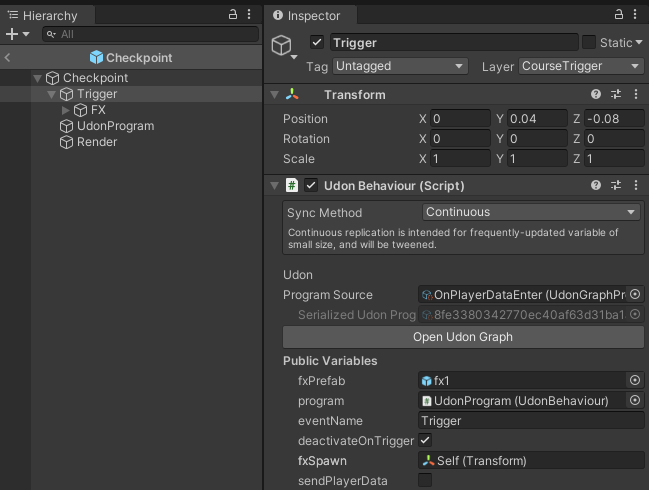
The "Trigger" object on this prefab uses a pattern that you'll see repeated on nearly every object that detects the player - Checkpoints, PowerUps, Hazards, Respawners, etc. We'll go into detail on this first prefab, and we can skip past it for the rest.
Your checkpoint needs a Collider on the CourseTrigger layer with isTrigger turned on and an UdonBehaviour with the OnPlayerDataEnter program.
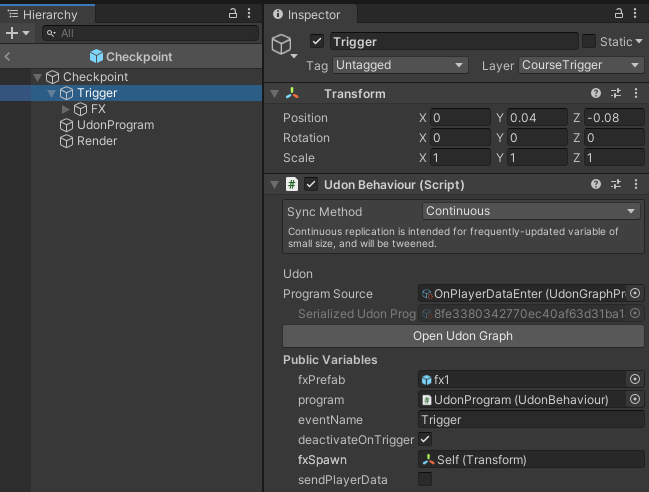
This UdonBehaviour needs the following variables set:
- fxPrefab should reference a Prefab which has some fun effects on it, and either the Udon Program DestroyAfterXSeconds or some other way that it destroys itself after some time.
- program should reference an UdonBehaviour on another object under this prefab, which has a Checkpoint program on it.
- eventName should be set to an Event that exists on the UdonBehaviour referenced above.
- deactivateOnTrigger should be checked for Checkpoints so that it can only be activated once per run until a player finishes the course.
- sendPlayerData is only required for a Checkpoint being used as a StartGate.
If you want to learn more about what's going on in this program, you can find the full documentation here: OnPlayerDataEnter
Checkpoint Program Requirements
All the above setup just detects the player, creates an FX object, and then triggers an event on the real program. In this case, that's a program called Checkpoint on an object called "UdonProgram". The program on the collider will try to run a program called "Trigger" on this UdonBehaviour.
All you need to do is have an object with an UdonBehaviour, with the Checkpoint program on it. all the variables of this program will be set automatically when you place it, or realtime when someone Triggers it in your world.
Start / Finish Program Requirements
If you're making a Checkpoint to be used as a Start or Finish Gate, you'll set up your program slightly differently. The Trigger Collider will be the same, and you'll use the same Checkpoint program, but you'll need to make the following changes:
For a StartGate:
- Set the eventName to "StartRace"
- Make sure sendPlayerData is on.
For a FinishGate:
- Set the eventName to "FinishRace"
Customize It!
As long as you have the Trigger Collider and Checkpoint Program set up as described above, you have a working checkpoint prefab you can use in your world. Note that when someone Triggers your checkpoint, the GameObject on which the Trigger Collider sits will be set to inactive. So if you want to hide the whole checkpoint, put the collider on the topmost object. If you want to just hide some parts like we do in the demo prefabs, make those parts children of the Trigger Collider object.
When the someone finishes running the course or Respawns themselves through their menu, the Course is Reset. When this method is called, the Course program will search every checkpoint for Trigger Colliders. It will set all the GameObjects with Trigger Colliders to inactive, except for the first one, which it will set to active (your Start Gate). Keep this in mind if you have additional colliders on your prefabs - their GameObjects will be set to inactive if the colliders have isTrigger turned on.
Add it to your Checkpoint Prefabs list
The Utility Window lists your "Checkpoint Prefabs" for easily adding them to your scene. You can drag and drop your new custom prefabs into this list to swap them out, or change the "Size" of the list first to add new empty slots to which you can add your new prefabs.
Making Custom PowerUps
Read through "Making Custom Checkpoints" above first to understand how the Trigger Collider system works, since it's the same for PowerUps. Once you've got a your Trigger Collider set up, you can work on the PowerUp program.
PowerUp Program Requirements
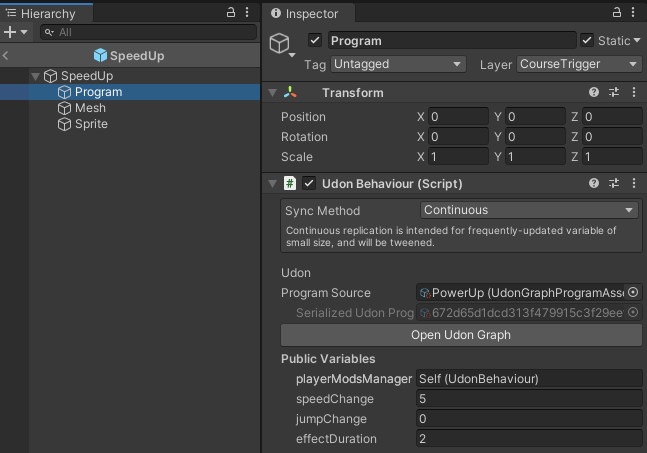
- First, make sure you have a Trigger Collider set up which calls "Trigger" on this UdonBehaviour.
- playerModsManager can be left alone, this will be injected when you create the PowerUp through the Utility window, or when you press "Refresh".
- Either speedChange or jumpChange should be set to something other than 0. Positive values will be added to the default *MoveSpeed or Jump Impulse you set as defaults in the Power Ups section of your Utility Window. Negative values will be subtracted. You can combine them - a PowerUp that makes you jump high but move really slow is totally valid.
- The effectDuration should be something higher than 0 (no negative numbers). This is how long the PowerUp will last. The player will get a message on their HUD that shows the change, this will fade away at the speed you've set here.
Add it to your PowerUps Prefabs list
The Utility Window lists your "PowerUp Prefabs" for easily adding them to your scene. You can drag and drop your new custom prefabs into this list to swap them out, or change the "Size" of the list first to add new empty slots to which you can add your new prefabs.
Making Custom Hazards
Hazards use the Trigger Collider setup that we documented under Checkpoints above, so make sure you've read through that first.
We've created two types of Hazard that you can work from - Respawn hazards and Spawned Hazards.
Respawn Hazards
This is the most common Hazard in our demo course. It uses a Trigger Collider to Respawn the player to the last Checkpoint. You need a trigger collider set up to run the "Trigger" event on another object which has the RespawnOnCourse program on it.
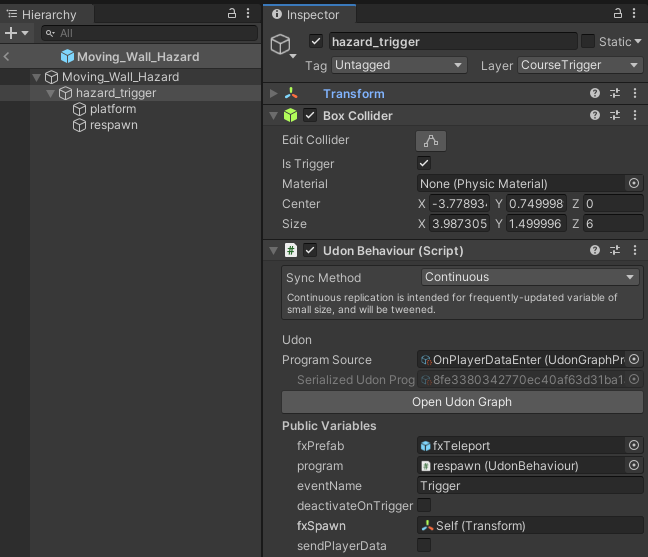
The RespawnOnCourse program will automatically have the course variable set when you Refresh your UtilityWindow.
Spawned Hazards
This hazard is made up of two parts, it's the most customized single-purpose Hazard we provide, as an example of extending our basic system to add functionality.
HazardSpawner Program

This program will spawn its prefab every delay seconds. It has a reference to playerModsManager which will be injected when the Utility Window is Refreshed. When it spawns a Hazard, it will look for an UdonBehaviour on the new object, and set its playerModsManager variable to the reference it has. This is needed so the spawned Hazard can reduce the player's speed.
SpawnedHazard Program
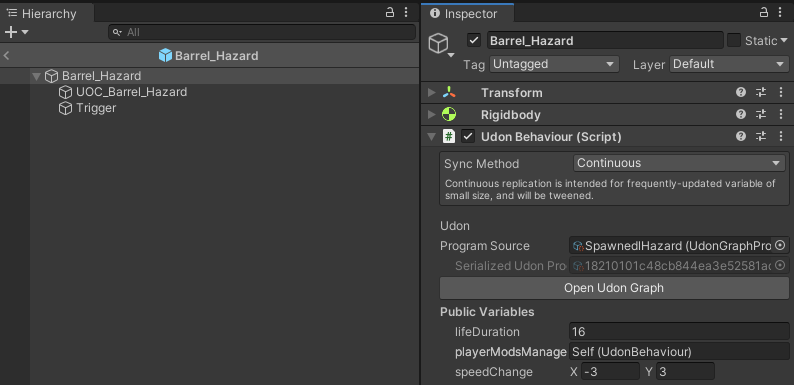
This prefab has a TriggerCollider on the "Trigger" child object which runs the event "HitPlayer" on the SpawnedHazard program.
- lifeDuration controls how long this prefab will exist after spawning, to ensure it doesn't stick around forever if there are no players around.
- playerModsManager is set by the HazardSpawner program
- speedChange works like a typical PowerUp. The 'x' value is the change to apply to the player's default speed, and the 'y' value is the duration of the effect. The default setting of (-3,3) on this prefab will subtract 3 from the player's speed for 3 seconds when they touch it.
Since these prefabs are not created and managed through the Utility Window, it's important to unpack them after you place them in your scene. Otherwise the auto-injection might not stick.
Other Customizations
Here are some other things you can play with:
Score Fields
If you want to change the look of the Score Fields or the number of scores that are shown, you can duplicated the "ScoreField" prefab, drop your new version into the "Score Object Prefab" slot in the "Score Manager" section of the Utility Window, and set the "Number of Scores to Show" to regenerate the UI that displays the scores.
HUD
You can change the look and layout of HUD items - just look through the hierarchy of the "HUD" object.
Minimap
If you want to change the camera angle, smoothing amount, etc of the Minimap, you can find the CinemachineVirtualCamera which it uses under "MinimapCameraSystem/VCam-Follow". Its Follow and LookAt variables are set at runtime, so if you want to test it in the Editor, you can drop in a Capsule, set that as the target for those two variables, and drag it around your course to see how it looks in the Minimap.
Advanced Stuff
You can click on the new Course Asset you made in your Project pane to see its raw data, and access all kinds of stuff that you can change at your own risk, like the default Udon Programs. You can also modify the "Variable to Scene Object Lookup" section:
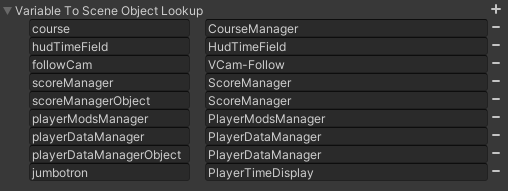
This is where the UtilityWindow looks when it runs Refresh() to inject the right objects into UdonBehaviours. On the left are variable names, and on the right are the names of objects in the scene on which the correct Component can be found. Right now, the system supports finding and injecting these Component Types:
- GameObject
- UdonBehaviour
- CinemachineVirtualCamera
So you can make a new Udon Program with a public variable called "course", and it will automatically be injected with the CourseManager UdonBehaviour. You can add your own items here, and even add additional types if you like - just modify the InjectVariableReferences method on the ObstacleCourseEditorWindow class, adding extra types in the if-chain. If you write a good generic Component handler, make a Pull Request to the git repo!